Now that cool weather has finally arrived, here are two quick, rewarding baking recipes.

( 1 ) WHOLE WHEAT POPOVERS
(This is sized for twelve-cup popover pan; reduce recipe to 2/3 size for 6 cup pan, i.e.: 2 eggs, 1 c milk, 1 c flour)
Instructions
- 3 large eggs, warmed (microwave them together for about 15 sec)
- 1 1/2 cups (355 ml) milk (skim, low-fat, or full-fat), lukewarm (can microwave milk 40 sec)
- 3/4 teaspoon salt
- 3/4 cup (110 g) all purpose (white) flour
- A scant 3/4 cup (100 g) whole wheat flour
- 2 tablespoons melted butter
- Preheat the oven to 440-450°F (230 °C). Position a rack on a lower-middle shelf. The top of the fully risen popovers should be about midway up the oven. You don’t want the tops of the popping popovers to be too close to the top of the oven, as they might burn.
- Use 12 cup nonstick popover pan, e.g. Chicago Metallic. Lightly grease the cups (may not be necessary every time). It is possible to use a standard, i.e. non-popover 12-cup metal muffin tin, one whose cups are close to 2 1/2″ wide x 1 1/2″ deep, though results may not be quite as good unless you preheat the muffin tin in the over for five minutes. As noted above, reduce recipe size for 6-cup popover pan (where each cup is somewhat larger than with the 12-cup popover pans).
- Use a wire whisk or beater on low speed to beat together the eggs, milk, and salt. Whisk till the egg and milk are well combined, with no streaks of yolk showing.
- Add the flour all at once, and beat till frothy; there shouldn’t be any large lumps in the batter, but smaller lumps are OK.
- Stir in the melted butter, combining quickly. Best to let batter then rest at least 10 minutes, e.g. while oven preheats.
- Pour the batter into the popover cups, evenly; about 2/3 full. [For 12 standard muffin cups: fill them about 2/3 to 3/4 full. ]
- Make absolutely certain your oven is heated, 440- 450°F.
- Bake the popovers for 19-20 minutes without opening the oven door. Reduce the heat to 360 °F [180 °C] (again without opening the door), and bake for an additional 15-20 minutes, until they’re a deep, golden brown. [If using muffin tins, for second phase cook only 10-15 min at 350 F]. Preferable: pierce them about 2 minutes before removing from oven to release steam.
- If the popovers seem to be browning too quickly, reduce temperature a little.
NOTES ON MAKING POPOVERS:
( A ) These are fairly healthy and easy to make, and taste delicious split open and served warm, with butter and jelly, for dessert or snack. Can also serve with things like chili or stew. Get creative and fill with pudding or whipped cream and fruit. Popovers taste almost like pastry, but without all the fat. The larger popovers from the 6-cup pans look more dramatic, and have big cavity inside them, especially when made with all white flour.
( B ) These are best cooked in special popover pans. These have typically six or twelve metal cups, joined by fairly thin metal rods, so heat can get quickly to the cups. It is possible to cook popovers in regular muffin tins.
( C ) The oven needs to be hot, and the oven door kept closed to keep moisture in, in order for the popovers to rise. They rise because steam gets trapped in sticky eggy dough.
( D ) You can make these with all white flour. Use a full 1.5 c white flour. (I cut back a little with the amount of whole wheat flour, since it absorbs more liquid than white flour). Using all white flour tends to make the popovers rise more, with thinner, drier walls. I like them a little thicker and chewier, hence the whole wheat.
( E ) Popovers are best when eaten within an hour or two of cooking. With time, the crispness of the outer wall gets softened by moisture from the inside. They can be re-crisped by heating in an oven or electric skillet or large covered frying pan at say 350 F for ten minutes or so. They can also be frozen, then gently thawed in microwave and then re-crisped.
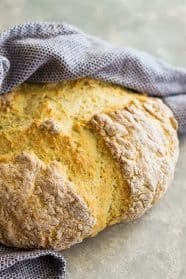
( 2 ) TRADITIONAL IRISH SODA BREAD (NO YEAST)
INGREDIENTS
- 4 cups (580g) all-purpose flour
- 1½ teaspoons baking soda
- 1 teaspoon salt
- Scant 2 cups (470ml) cold buttermilk
INSTRUCTIONS
( 1) If you don’t have buttermilk, first make it by adding 3.5 T vinegar or fresh lemon juice to measuring cup, and filling to two cups with whole or 2% milk (i.e. a scant 2 T vinegar per cup of milk). Stir and let sit for at least ten minutes for milk to sour. I used apple cider vinegar for a faint fruity aura.
(2) Preheat oven to 425 degrees F (218 degrees C) , or slightly hotter if your oven runs cool. Line a baking sheet with parchment paper or grease well; set aside. You can also use an 8″ cake pan or oven proof skillet.
(3) In a large bowl whisk together the flour, baking soda, and salt. Stir in the buttermilk just until combined and the dough starts to become too stiff to stir. Transfer to work surface and with floured hands lightly knead the dough 5-10 times or until all the flour is moistened and the dough comes together.
(4) Form dough into a 1 ½” (4 cm) high round, approximately 8” (20 cm) diameter. Place on prepared pan. With a serrated or very sharp knife cut a deep cross on the top from side to side, cutting about a third of the way deep into the dough. Bake for 30-35 minutes or until golden brown and it sounds hollow when tapped on the bottom. Alternatively, bake at 425-440 F for 20 min, then turn down to 400 F for last 15 or so minutes.
RECIPE NOTES FOR SODA BREAD
( A ) Note the dough for soda bread is NOT kneaded to the point of being smooth, but just enough to barely hold together, still looking “shaggy”. The reason is that with the baking soda, all the CO2 is released in a relatively short time as the dough heats up, so the dough has to be soft (not tough and cohesive) so it can quickly stretch. (This is the opposite from yeast bread, where you knead the dough long and hard to build gluten chains to strengthen the dough, so the CO2 produced slowly from the yeast during rising will not escape.)
( B ) The deep cross cut in the dough helps it expand, and helps heat to get to the center of the loaf.
( C ) This is authentic, basic Irish soda bread. The crust comes out pretty hard. It is great for dipping in stew or soup, or just spread with butter while warm and chew carefully. I like to have the crust a bit softer, so I brush the loaf with buttermilk or butter just before baking. When cooling the loaf, cooking on rack will make crust crispy, while being covered with tea towel will soften the crust.
( D ) As with most real bread, this goes stale very fast. I suggest cutting off whatever portion you will not eat that day, and freezing it. It is fine thawed. Bread that is not too stale can be partly, temporarily resuscitated by wetting the crust, and baking it for say 12 minutes at 350 F.
(This recipe above was mainly taken from: https://www.curiouscuisiniere.com/irish-soda-bread/ )
^^^^^^^^^^^^^^^^^^^^^^^^^^^^^^^^^^^^
https://www.simplyrecipes.com/recipes/irish_soda_bread/
This is a slightly more complex recipe for Irish soda bread, including butter, egg, a little sugar, and currants or raisins. Gives softer, sweeter version, verging on scone, instead of plain soda bread with tough crust. Has nice short confidence-building video showing how to work the dough. And has good photos of what dough should look like at each stage.
